Pages

Saturday, December 19, 2009

More Coupon Book Gift Ideas

Coupon Books are a great way to make a personal (and inexpensive) gift for anyone on your list! I posted a link to a Valentine's Day coupon book template last year and it was so popular that I thought it was time to dig up some more great templates and ideas! So here's a list of a few more of my favorites:

Some of these ideas may be technically for "Mother's Day Coupons" or "Valentine's Coupons" but by using festive paper you can easily transform any of these into "Christmas Coupons."

FiskarsCraft.com gives easy instructions for this adorable Christmas coupon book!

This fortune cookie coupon box is one of my favorites! Okay, it's technically for Valentine's Day Coupons, but swap out the pink hearts for some Christmas paper and voila! The Frugal Crafter has excellent step-by-step instructions for making the fortune cookies & the box (or you could just buy a similar box at a craft store and save some time).

Kodak.com has some great printable coupon cards that can be quickly bound together.

From Martha Stewart, these flower templates have little circle for each coupon. So cute!

I love this idea: bind together envelopes to make the coupon book! Get the simple instructions for this envelope book from Martha Stewart.

Have little ones? Help them give their favorite gift to Mom or Dad this year: time spent with them! Simple instructions for this kids coupon book from Martha Stewart.

Instead of a book, try folding some origami shapes with hidden coupons inside! These functional airplane coupons from Martha Stewart make takes coupon books to new heights!

Wednesday, December 16, 2009

Christmas Dinner Prep: Place Card Holders

Christmas is one of the special times of year when we break out the "good dishes", cloth embroidered napkins and silverware actually made from silver. I love setting a really fancy table for dinner parties and there is no shortage of ideas on the internet to made your Christmas feast fabulously fashionable. Now is the time to plan out your spread and table settings, especially if you plan on making special items.

Even if your dinner is low-profile, it's fun adding little last-minute tidbits for some flair. I made these leaf place cards in about 3 1/2 minutes.
Supplies: leaves + Sharpie = the end!
Instructions: gather leaves from outside, write names. Done!

Here are some other place card holder ideas that I just LOVE. Many of these you can make yourself!
Caroling Snowmen place card holders will serenade your guests with delight! 2 Styrofoam balls with some pins and ribbon and you're practically done!
styrofoam balls + pins + ribbon
Instructions: glue 2 styrofoam balls together, wrap ribbon around head and pin in place. Decorate face. Pin name cards in place. Done!
Martha Stewart has several great ideas, like this Tree place card holder. Quick, easy, free.
greenery sprigs + branches + name stars
Instructions: saw narrow branches into rounds for the base. Drill holes through rounds. Insert and glue greenery sprigs. Glue name stars to top. Done!
I'm not gonna lie, these Pop-Up place card holders might be reserved for the more talented crafter - with a lot of time on their hands! But take on the challenge and your guests will gush about your creativity.
Super-easy Ornament Place Card Holders
Ornament + wire + name card
Instructions: glue the name card to the ornament wire. Done.
OR
Curl the ornament hook to make a place to slip in the name card. Done.
(photo from Beau Coup)
Cookie place cards. Yum!
Cookie + Icing + Name Card
Instructions: bake or buy cookies, decorate, then place on dinner plates and tuck name card under a corner.
OR
Use the icing to write guests' names right on the cookie. Done!
(photo from Country Living)
paper plate + pen
Instructions: cut out Angel Place Cards according to instructions and template from Martha Stewart. Write guests' names. Done!
Pottery Barn offers these adorable silver-finished reindeer place card holders and they're on sale right now!

Not ready to spend your party budget on silver place card holders? Make them from acorns for FREE! :)
acorns + twigs + name cards
Instructions: glue twigs to acorns and shape like photo. Glue name cards to reindeer. Done!
Twig place card holders from Kindling.
wood limbs + name cards
Instructions: using a saw (electric or handheld) cut small wood limbs to 2"-3" lengths, all the same or vary for interest. Then cut a slit in one end about 1/4" deep. Insert name cards. Done!
I'm loving smooth river rocks for all sorts of projects lately - they're just so soothing to me. Little Things Favors brings us these river rock place card holders.
river rocks + tile cutter + name cards
Instructions: wearing safety goggles and gloves, use the tile cutter to slice a groove deep enough into the river rocks to hold a name card. Insert name cards. Done!
Having lived on an island twice now, I can't help but include these seashells in the mix. They may not scream "holidays" but not everyone lives in snow-filled winter wonderlands and these seashell place card holders from Beau Coup just might be the right touch to your Christmas Luau. :)
seashells + tile cutter + name cards
Instructions: similar to river rock place cards, don your safety gear and cut small slits into various seashells either found on the beach or purchased from a craft store. Insert name cards. Done!
Hand-carved pewter acorn place card holders from Kavik's Accents.

Know of other great place card holder ideas? Leave a link in the comments!

Tuesday, December 15, 2009

All Aboard the Table Train!

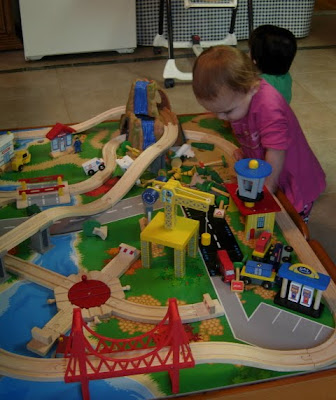
This is what I've spent the past week building: a Train Table! My mother-in-law runs one of the best day care centers in the bay area (www.BabyMacbean.com) and she surprised the babies with all this fun! And surprised me with the joy of assembling the table, buildings and track. :) I glued the track and buildings to the table so they can't tear it up, but left all the street signs, trees, people, cars, airplanes, trains, etc free-flowing for the babies' tiny hands to grab and play.
The name-brand train tables like Thomas the Train or Brio can cost hundreds of dollars. This set, complete with everything in the photos, was about $130+shipping. The trains and tracks are interchangeable with Thomas and Brio sets. IKEA also sells trains and tracks that are interchangeable as well, and very inexpensive. :)

(Here is the exact train table Claudia purchased from Amazon.com)

Monday, December 14, 2009

Turtle Brownie Tutorial

Making these brownies around Christmas is a long-standing tradition with some friends of ours (thanks for the recipe, Sue!) and I just couldn't resist sharing it with everyone - because they are dangerously delicious!

Ingredients:
anything made with this stuff just HAS TO BE GOOD!

1 pkg German Chocolate Cake Mix (although, I used Triple Chocolate, of course)
50 Caramels
1 pkg Chocolate Chips (6 oz.)
2/3 C Evaporated Milk
3/4 C Melted Butter

Instructions:
Preheat oven to 350 degrees.

Unwrap the 50 caramels and melt them with 1/3 cup evaporated milk in a pan over low heat, stirring occasionally. DO NOT LET THEM BOIL. Keep warm.

While the caramels are melting, start preparing the cake mixture by mixing the dry cake mix in a bowl with the melted butter and 1/3 cup evaporated milk.
Spread 1/2 this mixture evenly in a greased 9x13 pan (can use metal or glass pan). Bake for 6 minutes. Remove from oven and sprinkle the chocolate chips evenly throughout the pan.
By now the caramels should be nice and melted and ready for pouring.
Start in one corner of the pan and pour the melted caramels in rows over the chocolate chips in a smooth back-n-forth motion. If you have extra caramel when you reach the end, start back the other way until the entire pan is covered.
It will look something like this. Yum! :)
At this point, it will be tempting to just grab a spoon and dive in - BUT we're not done yet!

Take the remaining cake mixture and spoon out little dollups on top. You can make nice, neat little rows or plop them haphazardly. I'll leave that up to your taste and creativity. Bake for 20 minutes.
Now we're ready to eat! The way the caramel spills up through the cracks in the brownie is what gives this recipe its name: Turtle Brownies!
Enjoy!!

Wednesday, December 9, 2009

Welcome, Baby Presley!

JP's brother's wife just had their first baby yesterday...
CONGRATULATIONS!!!!
Her name is Presley (so cute!) and she weighs 7 lbs, is 19 inches long and has a head full of dark curly hair! Poor Alysa was in labor for 31 hours - ouch!

So happy for you, Paul & Alysa, and can't wait to meet Presley in person!!

Tuesday, December 8, 2009

DIY Christmas Wreaths

With Christmas fast-approaching, now is the time to make all those holiday decorations - if you haven't already!

In sticking with my "Christmas, Naturally" theme this year, here are some clever and crafty ideas for making your own wreaths with items from nature. Some of them may be a stretch, not 100% from Nature, but you get the idea. And hopefully you'll already have most of the supplies around your house, inside or out. :)

Acorn Wreath from Made.
I love this wreath! Dana's tutorials are SO EASY to follow with detailed step-by-step photos. Plus, she shows you how this wreath will look when left naturally unpainted, or splashed with color.

My dear sister, Heidi, made this wreath from wrapping paper in 20 minutes! She's unbelievably crafty, and thrifty! :)

GoodHousekeeping.com hit the mark with this Recycled Holiday Card Wreath.
I've seen lots of ways to use old greeting cards, but this is one of my favorites.
Scroll through to #5 for instructions.

This paper flower wreath from Holly's Charmed Life is 100% adorable!
The holiday buttons in the center of each flower add a nice extra touch of holiday magic.

Okay, so metal cookie cutters aren't exactly found in nature, but they SHOULD be! Wouldn't that be great?!
This Star Wreath can be found at GoodHousekeeping.com.
(Scroll through to #7 for instructions)

Many parts of the country are being hit with huge snow storms this week. Put all that cold to good use with this Ice & Berry Wreath from BlissTree.com.

Adorable craft + no sewing = Easy Christmas Decor!
Whip up this Fabric Wreath in no time with tutorial from So You Think You're Crafty, the hottest new craft challenge website, a la Project Runway! This wreath won the Week 2 "Leaves" Challenge.

Great way to decorate & share your photos with this Paper Wreath from InspireMe Crafts.

C'mon, you know you love this! Plus, now you can take those ugly, er...interesting mounted antlers your husband hung in your living room or attached to the front of his truck and put them to much better use in this fashion-forward and festive Antler Wreath from Oly Studios (shown in Elle Decor) that even Bambi would love.

GoodHousekeeping.com is the source for many pretty cool and easy-to-make wreaths, including this Paper Star Wreath (Scroll to #3). Highhopes.com shows you how to make the paper stars.

It's not a craft blog without a nod to Martha! She turns crafty into classy once again with this beautifully simple Cedar Wreath Chandelier.

Button up for the holidays with the Button Wreath from ReadyMade Magazine.

Christmas is for the birds - really! Spread the love to your flighty friends with this Bird Seed Wreath. This is a great project to share with your kids, too.

First you take down his antlers and now you're raiding his closet for this awesome Tie Wreath! I bet your husband is just LOVING your crafty side this year! :)
Instructions from, once again, Good Housekeeping (scroll to #2)